Configure the SIP Domain
To configure the SIP domain, follow these steps:
- Press the Volume up key on the side of the handset when it is in an idle state.
System Status display shows the MAC Address of the phone, the IP address of the Gateway, Boot status (not accurate so ignore it) and IPEI.
- Record the IPEI for the handset.
- Enter the configured or DHCP assigned IP address into a web browser example: http://xxx.xxx.xxx.xxx. Username and password are admin/admin.
- Click VoIP Account 1 and then configure as follows:
-
Server is local: Yes
-
Display Name: Assigned Name for the User (There is a 19 character limit)
-
Account: Enter the extension of the User
-
Password: User’s PIN for that extension
-
Account Name: Assigned User Name for the Account
-
Account Mailbox Name: User’s Extension
-
Account Mailbox Number: Feature activation code for Voicemail *98
-
Registrar: Callp IP address
-
Outbound Proxy: Callp IP address
-
Authentication Username: User’s extension
-
Server Port: default (5060)
-
Outbound Proxy Port: default (5060)
-
Registrar Config: Leave default
-
Keep Alive: enabled
-
DMTF Signaling: Set to RFC 2833
- Leave the rest as default and click Save.
- Click Telephony Settings from the menu on the left.
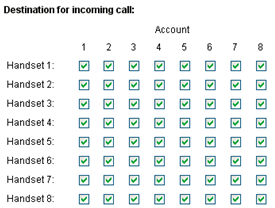
- Under Destination for incoming call, choose which handset to forward incoming calls to.
- Under Outgoing Identity to be used for
- Assign an account to each registered handset.
If you want unique outgoing identities for outgoing calls from each handset, assign a different account number to each handset. For example, assign Handset 1 with Account 1, Handset 2 with Account 2, and so forth.
- Enter the handset name that you want displayed on the called phone.
- Enter the IPEI of the handset that you recorded on page 7.
- Set the Join calls allowed option to Disable.
- Set the Match IPEI to Handset to Enable.
- In the left frame of the Configurator web interface, click Time Settings, and then do the following:
- Enter the hostname of a Time Server on the internet or an IP address of your internal or external NTP server, for example,
pool.ntp.org or 129.6.15.28
- Enter the time server refresh interval, for example, 255
- Set the time difference between Greenwich Mean Time (GMT) and your current location. For example, if you are in New York, set the Time zone field to – 5:00 hours (EST).
- Set Daylight Savings Time (DST) to Automatic and leave all other settings as default--all DST settings are updated through the NTP server. (The default DST is Automatic set for North America.)
- Click SAVE CHANGES at the bottom of the screen.
- Click REBOOT.
The handset reboots and registers with the silhouette system.
The Phone Inventory Page accessed via WebAdmin shows the DECT Gateway and User as a SIP Terminal.
 Get More Help